Wednesday, June 06, 2007

Architecture and Classes ( Microsoft Synchronization Services)

Microsoft Synchronization Services for ADO.NET is a set of DLLs that provides a composable application programming interface (API). Depending on the architecture and needs of your application, you can use all or only some of the components provided. Synchronization Services enables synchronization between a SQL Server Compact Edition client database and a server database or any other data source, such as a service that provides stock quotes in XML. For synchronizing two databases, Synchronization Services supports two-tier and N-tier architectures using any server database for which an ADO.NET provider is available. For synchronizing between a client database and other types of data sources, Synchronization Services supports a service-based architecture. This architecture requires more application code than two-tier and N-tier architectures, but it does not require a developer to take a different approach to synchronization. Rather, it provides a great deal of flexibility for extending the architecture of your application to include synchronization.

The following diagrams show the components involved in two-tier, N-tier, and service-based architectures. The diagrams each show a single client, but there are often multiple clients synchronizing with a single server. Synchronization Services uses a hub-and-spoke model. All changes from each client are synchronized with the server before the changes are sent from the server to other clients (clients do not exchange changes directly with each other). Synchronization Services provides snapshot, download-only, upload-only, and bidirectional synchronization:

Snapshot and download-only synchronization are typically used to store and update reference data, such as a product list, on a client. Data changes that are made at the server are downloaded to the client database during synchronization. Snapshot synchronization completely refreshes data every time the client is synchronized; it is appropriate when you don't want to track incremental changes, or the server does not have the ability to do so. Download-only synchronization downloads only the incremental changes that have occurred since the previous synchronization.


Upload-only synchronization is typically used to insert data, such as a sales order, on a client. Inserts and other data changes made in the client database are uploaded to the server during synchronization.


Bidirectional synchronization is typically used for data, such as customer contact information, that can be updated at the client and server. Any conflicting changes must be handled during synchronization.


Components in the Architecture Diagrams
The components in the architecture diagrams include the client and server databases and a set of classes from the Synchronization Services API. The N-tier and service-based architectures also includes Proxy, Web Service, and Transport components that you must write.

The first diagram shows a two-tier architecture with a client database and a server database.


With the exception of the two databases, all items in the diagram correspond to Synchronization Services classes, which are contained in the following DLLs:

Microsoft.Synchronization.Data.dll contains Synchronization Agent, Synchronization Tables, and Synchronization Groups.


Microsoft. Synchronization.Data.Client.dll contains the Client Synchronization Provider.


Microsoft. Synchronization.Data.Server.dll contains the Server Synchronization Provider and Synchronization Adapters.


All the DLLs depend on System.dll and System.Data.dll from .NET Frameworks 2.0 or later. Microsoft.Synchronization.Data.Client.dll also depends on System.Data.SqlServerCe.dll from SQL Server Compact Edition. For 2-tier applications, all Synchronization Services DLLs reside on the client; for N-tier applications, Microsoft.Synchronization.Data.dll and Microsoft.Synchronization.Data.Server.dll reside on a separate computer that provides a synchronization service.


The second diagram shows an N-tier architecture, which requires a proxy, a service, and a transport mechanism to communicate between the client database and the server database. This architecture is more common than a two-tier architecture, because an N-tier architecture does not require a direct connection between the client and server databases.


The third diagram shows a service-based architecture. This architecture includes a client database, but does not include a server database or the corresponding Server Synchronization Provider and Synchronization Adapters. To use this type of architecture, your application must be able to communicate to the Synchronization Agent through a custom proxy and custom service that provides the same functionality that the Server Synchronization Provider and Synchronization Adapters usually provide, such as retrieving changes to synchronize.


Client Database
The client database for Synchronization Services applications is SQL Server Compact Edition. Synchronization Services provides an infrastructure to track incremental changes in the client database. This infrastructure is enabled the first time any table is synchronized using a method other than snapshot synchronization. Synchronization Services adds the following objects to the client database:

The system table __sysOCSDeletedRows is used to track deletes for all tables that are involved in synchronization.


The system table __sysTxCommitSequence is used to ensure transactions are tracked in the proper sequence.


The columns __sysChangeTxBsn and __sysInsertTxBsn are used to track inserts and updates. The columns are added to each table involved in synchronization.


Server Database
The server database can be any database for which an ADO.NET provider is available. For this Community Technology Preview (CTP) release, the Synchronization Services API has been tested primarily using SQL Server 2005, but we encourage you to try the API with SQL Server 2000 and recent versions of Oracle, IBM, and Sybase databases. If you want to track incremental changes in the server database, you must prepare the database to do so. For more information, see How to: Prepare a Server Database for Synchronization.

Synchronization Services Classes
The following classes are represented in the diagram: SyncAgent, ClientSyncProvider, ServerSyncProvider, SyncTables, SyncGroup, and SyncAdapter.

Synchronization Agent
The synchronization agent is the engine that drives synchronization. It loops through each of the tables to be synchronized; calls the client synchronization provider to retrieve and apply changes at the client database; and calls the server synchronization provider to retrieve and apply changes at the server database. The synchronization agent also maintains session level information for the synchronization and bubbles up success messages, errors, and statistics to the application on the client. For more information, see SyncAgent.

Client Synchronization Provider
The client synchronization provider communicates with the client and shields the synchronization agent from the specific implementation of the client database. The Synchronization Services includes a provider for the SQL Server Compact Edition database. The principal activities of the client synchronization provider are:

Storing information about tables on the client that are enabled for synchronization.


Retrieving changes that occurred in the client database since the last synchronization.


Applying incremental changes to the client database.


Detecting conflicting updates.


For more information, see SqlCeClientSyncProvider.

Server Synchronization Provider
The server synchronization provider communicates with the server and shields the synchronization agent from the specific implementation of the server database. The principal activities of the server synchronization provider are:

Storing information about tables on the server that are enabled for synchronization.


Enabling applications to retrieve changes that occurred in the server database since the last synchronization.


Applying incremental changes to the server database.


Detecting conflicting updates.


For more information, see DbServerSyncProvider.

Synchronization Table and Synchronization Group
A synchronization table is defined for each table that is synchronized. It stores settings, such as the direction of synchronization. Each client can request only the tables it needs, which might not include all the tables that the Server Synchronization Provider makes available. For example, there might be twenty tables, ten of which are configured for bidirectional synchronization in the Server Synchronization Provider. A client might request only twelve of the tables as download-only. Although the server supports upload, the client isn't required to make changes or to synchronize all tables. For more information, see SyncTable.

After a synchronization table is defined it can be added to a synchronization group. A synchronization group is a mechanism to ensure consistent application of changes for a set of tables. If tables are included in a synchronization group, changes to those tables are transferred as a unit and applied at the server in a single transaction. If any change in the group fails, changes for the entire group are retried on the next synchronization. For more information, see SyncGroup.

Synchronization Adapter
Modeled after the data adapter in ADO.NET, the synchronization adapter is defined for each table that is synchronized. It makes available to the server synchronization provider the specific commands needed to interact with the server database, such as the InsertCommand that propagates inserts on the client database to the server database. Because Synchronization Adapters use the ADO.NET DbCommand object, the developer can use any command structure supported by ADO.NET, including inline Transact-SQL, stored procedures, views, functions, and so on. The commands simply require a single result that defines the structure and data to be transferred and applied. For more information, see SyncAdapter.

Proxy, Service, and Transport
Proxy, Service, and Transport are used in N-tier and service-based architectures:

In N-tier applications, Microsoft.Synchronization.Data.Server.dll is used but it does not reside on the client. It typically resides on a middle tier that has a direct connection to the server database. In this case, a proxy and service are required to communicate between the client and the middle tier:


On the client, application code references a proxy for the server synchronization provider rather than directly referencing the provider. The proxy communicates with a service on the middle tier.


On the middle tier, the service inherits from and exposes the same methods as ServerSyncProvider (the abstract class from which DbServerSyncProvider inherits). The server synchronization provider methods are then executed over a direct connection to the server database. Results are routed through the middle tier and back to the client.


In service-based applications, Microsoft.Synchronization.Data.Server.dll is not used on the client. The application code must provide the same functionality that the Server Synchronization Provider and Synchronization Adapters normally provide:


On the client, application code references a proxy for the application code that handles server synchronization provider tasks such as retrieving changes from the data source. The proxy communicates with a service on the middle tier.


On the middle tier, the service inherits from and exposes the same methods as ServerSyncProvider (the abstract class from which DbServerSyncProvider inherits). The methods are then executed by your application code over a direct connection to the server database. Results are routed through the middle tier and back to the client.


Additional Classes in the API
The diagrams in this topic show the major classes in the API, but there are a large number of classes that are not shown. To read information about all of the available classes, see Microsoft.Synchronization.Data, Microsoft.Synchronization.Data.Client,and Microsoft.Synchronization.Data.Server. In the meantime, the following descriptions provide an introduction to four other important classes that you should be familiar with.

Synchronization Anchor
A reference point in time for a set of tables synchronized from the server. Synchronization anchors enable an application to determine which changes should be synchronized during a given session. During synchronization, the client synchronization provider stores in the client database: a last received anchor, which identifies the last change downloaded from the server; and a last sent anchor, which identifies the last change uploaded from the client. On the next synchronization, an application can use these anchors to identify the starting point for synchronizing the next set of changes. For more information, see SyncAnchor.

Synchronization Session Statistics
A set of statistics that the Synchronization Agent provides for each synchronization session. The statistics include information about synchronization times, the number of changes processed, and any conflicts or exceptions that occurred. For more information, see SyncStatistics.

Synchronization Session Variables
Variables that are made available to the developer to use as parameters for the select, insert, update, and delete commands executed at the server. The variables can be used in a number of ways, including: to provide support for conflict detection; to avoid downloading changes to a client more than once; to provide different table schema based on the client database version. The Server Synchronization Provider includes built-in session variables and allows you to create additional variables to pass information to the server. For more information, see SyncSession.

SQL Server Synchronization Adapter Builder
Modeled after the command builder in ADO.NET, the synchronization adapter builder is an aid to developing code for the synchronization commands that are executed by the server synchronization provider. The synchronization adapter builder produces select, insert, update, and delete commands for SQL Server databases based on information that you provide about the tables involved in synchronization. For more information, see SqlSyncAdapterBuilder and Tools to Aid Development (Synchronization Services).

Thursday, May 03, 2007

Viewstate-less ASP.NET Pages

Theoretically speaking, the viewstate of an ASP.NET page is a chunk of data that represents the last known good state of the page. Upon page rendering, each server control stores in the viewstate the current value of each tracked property. The viewstate is persisted for each page instance and retrieved when the same page instance posts back. The goal of the viewstate is supporting the ASP.NET runtime when it comes to distinguishing postback requests from first-time requests and recreating the state the page had last time it served markup to the client. Put another way, the viewstate allows the ASP.NET runtime to start processing the page from where it left off last time. We all know that HTTP requests are stateless and, in light of this, we're not surprised to find out that two successive requests for the same page in the same session are completely independent and decoupled. This is clearly a problem for Web applications—an old problem indeed. If the user types in some text and submits its work to the server, it is a reasonable expectation that the same HTML element used to contain the text doesn't lose its contents upon postback. This is exactly what would happen, until some countermeasures are applied. In classic ASP, countermeasures were more of tricks and made large use of code blocks and the Request object. In ASP.NET, the same pattern was engineered in the framework and took the form of the viewstate.

Practically speaking, the viewstate is a hash table that contains a tree of hash tables, one for each control in the page tree. Each control's hash table contains a collection of name/value entries where name equals the name of a control's property and value is the current value of that property. A control doesn't have to persist to the viewstate all of its properties. Only properties explicitly implemented as trackable go to the viewstate. What makes a control property trackable? Its implementation:


public string Text
{
get { (string) return ViewState["Text"]; }
set { ViewState["Text"] = value; }
}

In this way, whenever you assign a value to the Text property, the value is not stored within the current instance of the control but in a global container—the viewstate. When an ASP.NET page is done with rendering, it asks all controls to save their viewstate to the page's viewstate. The page's viewstate is then serialized to a binary stream and then encoded to Base64. The resulting string is attached to the client markup for the page as a hidden field. In this way, when the page posts back the viewstate is automatically uploaded and used to recreate the last known good state for that instance of the page.

The use of the viewstate is controversial among ASP.NET developers. The most common snag is that it takes up too much bandwidth in download and upload. In effect, the viewstate can easily reach 10 or even 20 KB. In general, it takes much more than the actual markup. And it's completely ignored and useless for client browsers.

Can you disable it programmatically for ASP.NET pages? You bet. You can do that on a per-page and/or per-control basis. And what's the final effect?

You simply lose the last-known good state. Which is not necessarily a bad thing. For example, imagine a page with a TextBox control. By default, the TextBox saves at least 10 properties to the viewstate, including Text, ReadOnly, MaxLength and visual properties. What's the property you really update across postbacks? 99 percent of the time, it is the sole Text property. This means that ReadOnly, MaxLength, and all visual properties most of the time retain the value you originally hard-coded in the ASPX page markup. Those values are automatically restored on each request because a new page instance is created. Unless you change some of these properties programmatically, you don't need viewstate for a text box. Nonetheless, thousands of developers do that. What about the Text property? It still works as expected, even with a disabled viewstate.

Why? It's because the value typed by the user is posted back along with the viewstate and used to overwrite the last-known good state. So as far as the Text property is concerned, losing the last-known good state is no big deal.

The viewstate is a key feature of ASP.NET, and it's on by default for all properties of all controls (that support it). Using it only when strictly needed will reduce the size of the page significantly and with the download speed of the page

Friday, February 16, 2007

Static Methods, Factories

What Is a Static Field or Method?

Let's change the question. When is a field or method not part of an object? Answer: when it is part of the class! Remember, an object is an instance of a class and each object exists in a separate space in memory. It is possible to access class fields and class methods without creating an instance of a class using the "static" key word. Declaring a field or method with the static key word, tells the compiler that the field or method is associated with the class itself, not with instances of the class. In a sense, static or "class" fields and methods are global variables and methods that you can touch using the class name. If you think of a class as a blueprint used to create objects, then you can think of static fields and methods are being part of the blueprint itself. There is only one copy of the static fields and methods in memory, shared by all instances of the class.

Static fields are useful when you want to store state related to all instances of a class. A counter is a good example of a static field. The classic use of a static counter is to generate a unique ID or serial number for each instance of a class.

Static methods are useful when you have behavior that is global to the class and not specific to an instance of a class. In contrast, instance methods are useful when the method needs to know about the state of an object. Since data and behavior are intertwined in an object, instance methods have access to the instance fields and can exhibit behavior that is specific to the state of an object.

Using Static Factory Methods Instead of Multiple Constructors


You might wonder why I have chosen to combine the topics of static methods and constructors into a single chapter. The answer is "static factory methods." Instead of writing multiple public constructors, you can write multiple static factory methods and private constructors that return objects. First, here is an example of a static factory method. The method simply constructs an object with default values and then returns a reference to the object.

public static Toaster GetInstance()
{
return new Toaster(ColorType.Black, DEFAULT_NAME);
}


In a sense, this static method is analogous to the no-arg constructor.

public Toaster() {}

Here is the version of the Toaster class that uses static methods and a single private constructor to return toaster objects:

///
/// Summary description for Toaster
///

class Toaster
{
// static factory methods
public static Toaster GetInstance()
{
return new Toaster(ColorType.Black, DEFAULT_NAME);
}
public static Toaster GetInstance(string modelName)
{
return new Toaster(ColorType.Black, modelName);
}
public static Toaster GetInstance(ColorType color)
{
return new Toaster(color, DEFAULT_NAME);
}
public static Toaster GetInstance(ColorType color, string modelName)
{
return new Toaster(color, modelName);
}
public const string DEFAULT_NAME= "Generic";
public enum ColorType {Black, Red, Yellow, White}; // black is the enum default value!
private static ColorType DEFAULT_COLOR= ColorType.Black;
private ColorType color= DEFAULT_COLOR;
private string modelName= DEFAULT_NAME;
// the single private constructor
private Toaster(ColorType color, string modelName)
{
this.color= color; // ColorType cannot be null --> compile time error or defaults to ColorType.Black!
if (modelName != null)
{
this.modelName= modelName;
}
}
// the getters
public string Color
{
get
{
return Enum.Format(typeof(ColorType), color,"G");
}
}
public string ModelName
{
get
{
return modelName; // danger, return ModelName --> stack overflow!
}
}
}

Declaring the only constructor private, prevents any outside caller from directly instantiating the class. The only path to a Toaster object is through a static factory method. So, you can use multiple overloaded public constructors or multiple static factory methods and private constructors to create toaster objects. If you are interested in learning more about using static factory methods instead of multiple constructers check out Effective Java Programming Language Guide by Joshua Bloch, Addison-Wessley, 2001, 252 pp.

Note: The behavior of enum is quite complicated. You cannot set an enum to null and if you fail to explicitly initialize an enum variable, it defaults to the first member of the enumeration. For example:

public static ColorType c; // c --> ColorType.Black


Creational Patterns -- Class Factory and Singleton

I am going to finish off this chapter by introducing two common design patterns: the "Class Factory" and "Singleton" patterns. The class factory is useful when you want to return concrete objects that share a base class, at runtime. The singleton pattern is useful when you only want to allow the creation of one instance of an object in a application. These patterns are both considered "Creational" patterns since they abstract the creation of objects.

Using a Static Method to Return Concrete Classes -- The Class Factory.

The concept of using static methods to return objects is a useful one. In the previous code, you learned how to replace multiple constructors with multiple static factory methods. Another useful design pattern is the "Class Factory." A class factory can be used to return concrete implementations of a common base type.

In Chapter 2, you learned about polymorphism using the Drawable abstract class. Concrete implementations of the Drawable class such as square or circle provide a concrete implementation of the abstract "DrawYourself" method. Let's resurrect our Drawable class.

abstract class Drawable
{
public abstract String DrawYourself();
}
class Circle : Drawable
{
public override String DrawYourself()
{
return "Circle";
}
}
class Square : Drawable
{
public override String DrawYourself()
{
return "Square";
}
}


In this example of the class factory pattern, you pass a parameter to a static factory method that then returns the appropriate concrete implementation of the Drawable abstract class. To insure that the method is passed valid parameters at compile time, you can define a type safe enum "DrawableType":

public enum DrawableType {CIRCLE,SQUARE};


Here is our class factory:

///
/// Summary description for class Factory.
///

class Factory
{
public enum DrawableType {CIRCLE,SQUARE};
public static Drawable GetInstance(DrawableEnum e)
{
if (e == DrawableType.CIRCLE)
{
return new Circle();
}
else if (e == DrawableType.SQUARE)
{
return new Square();
}
else
{
throw new IndexOutOfRangeException(); // should never get here
}
}
///
/// The main entry point for the application.
///

[STAThread]
static void Main(string[] args)
{
//
// TODO: Add code to start application here
//
Drawable d1= Factory.GetInstance(Factory.DrawableType.CIRCLE);
Console.WriteLine(d1.DrawYourself());
Drawable d2= Factory.GetInstance(Factory.DrawableType.SQUARE);
Console.WriteLine(d2.DrawYourself());Console.ReadLine();
}
}


Note that d1 and d1 are reference variables of the Type Drawable, yet the code outputs: Circle, Square. Polymorphism at work! The class factory design pattern allows your application to create concrete implementations of a base class or interface dynamically at runtime in response to user or system input.

The Singleton Pattern

The "Singleton" pattern is a special version of the class factory that only returns a single instance of a class. The singleton pattern is useful when there should only be one instance of an object. As an example, there may be many soldiers that derive from person, but there should only be one reigning King of England that derives from person! Here is a sample that uses a static factory method to insure that only one instance is created. The factory method "GetInstance" returns a reference to the single instance of the class. Note that you must declare any constructors private, so that the constructors are not visible outside of the class. This insures that. there will be one and only one instance of MyClass.

///
/// Summary description for MyClass.
///

class MyClass
{
private static MyClass theOnlyOne= new MyClass(); // create one and only one instance of the class
public static MyClass GetInstance()
{
return theOnlyOne;
}
public readonly string description= "The One and Only.";
private MyClass(){}
///
/// The main entry point for the application.
///

[STAThread]
static void Main(string[] args)
{
//
// TODO: Add code to start application here
//
MyClass mc= MyClass.GetInstance();
Console.WriteLine(mc.description);
Console.ReadLine();
}
}


One of the advantages of the factory method is that you can modify the singleton behavior of the class without affecting the caller of the class. If you decide that your application should now support Kings present and past, then you can modify MyClass to return a new instance for each call to GetInstance. Here is the modified multi-instance version of MyClass:

///
/// Summary description for MyClass
///

class MyClass
{
public static MyClass GetInstance()
{
return new MyClass();
}
public readonly string description= "OneOfMany";
///
/// The main entry point for the application.
///

[STAThread]
static void Main(string[] args)
{
//
// TODO: Add code to start application here
//
MyClass mc= MyClass.GetInstance();
Console.WriteLine(mc.description);
Console.ReadLine();
}
}

Tuesday, January 23, 2007

Updater Application Block

Introduction
Automatically deploying your windows forms applications is one of most discussed features in .NET Development. There are many different solutions to this problem: Running applications from the Web (See http://www.theserverside.net/articles/showarticle.tss?id=RunFromWeb), the Windows form App Updater Component (See http://www.theserverside.net/articles/showarticle.tss?id=AppUpdater), and VS.NET 2005 adds support for deploying applications from the web.

In this article, I’ll discuss one other option: the Application Updater Starter Block from the Practices and Guidance Group at Microsoft. The Application Updater block provides one implementation you can use to automatically update your applications. Unlike some other solutions, the AppUpdater block was designed so that you can extend and modify it to suit your purposes. Several .NET developers have written and posted extensions or modifications to it. I would choose to base my no touch deployment implementation on the AppUpdater when two conditions are true:


First, you can’t wait for VS.NET 2005. No Touch deployment is built in to VS.NET 2005. It’s easier to use than any of the other options.

Second, you need to extend the features in the AppUpdater component. The design of the Updater Application Block provides quite a few more opportunities for extension than the AppUpdater Component.

I’ll give an overview of how to use the Updater Application Block. I’ll show up the possible extension points for creating your own implementations of some of the components. I’ll finish by discussing the reasons for picking one component over another. This article does not include its own sample, I’m relying on the samples that come with the Updater Block. To get a clear idea of the tasks that are involved in building an application that automatically updates itself, see the App Updater article. The steps are the same, even though the component is different. This article focuses on the architecture and design of the Updater Application Block.

Download and Installation
The Updater Application block installation is a two step installation. You must install the application block, then run the quick start scripts to configure both the server and the client for updates. Of course, you’d know this if you read the readme.txt file, but no one does that. The point is you don’t just load the solutions, build them, and try to run the updater. It won’t work. The quick start scripts create virtual directories on the server, install all the updates to those directories and configure the client applications to search for updates on the local host web server.

Using the samples
The samples that come with the Updater show the same basic tasks needed to auto-update an application:

Use a shim to load the application. (This facilitates updating a running application)
Code on the client machines periodically polls a known server for updates.
When a new update is available, it is downloaded and verified.
After verification, the new version is installed.
The application restarts and the new version runs.
Given these four basic tasks, it’s no surprise that most of the implementations you’ll find are reasonably similar in their design and implementation. If anything, such similarities shows that these different implementations are on the right track. The one item that separates the Updater Application Block is that its design is extensible: All the key tasks are defined by interfaces and you can create new classes to implement any of them. Before we get that far, let’s go over the solutions already provided in the Updater.

The AppStart assembly contains the shim that loads the target application. The Updater starter block includes support for running only one version of the target application. In its main routine, it creates a Mutex to ensure that the target application is not currently running:


//Check to see if AppStart is already running FOR the
// particular versioned folder of the target application
bool isOwned = false;

_appStartMutex = new Mutex( true, _config.ExePath +
_mutexGuid.ToString(), out isOwned );

if ( !isOwned )
{
MessageBox.Show(
String.Format(
CultureInfo.CurrentCulture,
"There is already a copy of the application '{0}' running. Please close that application before starting a new one.",
_config.ExePath ) );
Environment.Exit( 1 );
}

StartApp_Process();

The code snippet above uses a system mutex to determine if another copy of the AppStarter, targeting this same application, is running. The StartApp_Process method launches the target application, after setting the working directory correctly:

_exePath = Path.Combine( _config.FolderName , _config.ExePath );

//Start the app
try
{
ProcessStartInfo p = new ProcessStartInfo (_exePath);
p.WorkingDirectory = Path.GetDirectoryName(_exePath);
_process = Process.Start (p);
Debug.WriteLine("APPLICATION STARTER: Started app: " + _exePath);
}
catch (Exception e)
{
Debug.WriteLine("APPLICATION STARTER: Failed to start process at: "
+ _exePath);
HandleTerminalError(e);
}

As you’ll see a little further on, the config object returns the current version of the application to shim. When the downloader retrieves new versions, it writes new entries to determine which version should be launched.

Find and Download New versions
Finding and downloading content is accomplished by a class that implements the IDownloader interface. The IDownloader interface contains four methods, to support both synchronous and asynchronous downloading:

public enum JobStatus
{
Ready,
Downloading,
Error,
Cancelled,
Validating
}

public interface IDownloader : IDisposable
{
void Init( XmlNode config );

void Download( string sourceFile, string destFile,
TimeSpan maxTimeWait );

Guid BeginDownload( string[] sourceFile, string[] destFile );

JobStatus GetJobStatus( Guid jobId );
}

The Updater Application block contains one class that implements the IDownloader interface: The BITS Downloader. BITS is a service available on Windows 2000 and above. It is used by the Windows Update service to retrieve its updates. It is secure, handles interruption in service, and works quietly in the background. The downside is that it won’t work if you need to support older Windows versions, like Windows 98. In that case, you’ll need to create your own downloader for those aging clients. The best part about this design in the Updater Application Block is that it is configurable at runtime. The ApplicationUpdater reads a configuration file to determine which downloader to create. The config section looks like this (formatted for your screen, not for your config reader):


type=
"Microsoft.ApplicationBlocks.ApplicationUpdater.
Downloaders.BITSDownloader"
assembly=
"Microsoft.ApplicationBlocks.ApplicationUpdater,
Version=1.0.0.0,Culture=neutral,PublicKeyToken=null"/>


You could create a different downloader for other clients. You could then write a different key in the config file when you install the system to launch a different downloader on outdated systems. As I said earlier though, while I like the architecture and design of the Update block, I would use the AppUpdater control before I would write my own custom downloader.

Validating what you download
Downloading and installing new stuff is great, but you need to guard against replacing your application with some other arbitrary executable. The Updater application block uses signatures to determine if the file has been tampered with. If there is any doubt about the file’s authenticity, the installation is aborted.
The validation contract is defined by the IValidator interface. Like the downloader, this means that you can create your own validator using your own algorithm, as long as you implement the interface:

public interface IValidator : IDisposable
{
void Init( XmlNode config );

bool Validate( string filePath, string signature );

bool Validate( XmlNode xml, string signature );

string Sign( string filePath, string key );

string Sign( XmlNode xml, string key );

}

The Init method is a hook to let you initialize your validators. The Validate and Sign methods are pairs: when you create an update for automatic download, you generate a signature for each file in the download. The signature gets generated by the Sign() method and then must be written into the server manifest file. The download client attempts to match the signatures using the Validate( ) method. The Updater Application block includes a utility application that uses the configured validator to generate the manifest (See Figure 1).

Validation is very important for any system that supports auto-updating; it’s worth going over in more detail. Remember that any assembly loaded from your computer is fully trusted. It was loaded from the “My Computer” zone. That means version 1.0.0.0 of your application is fully trusted. Your fully trusted application can go to the web, and download new assemblies without raising warnings from the system. After downloading these new assemblies, they will be loaded from the “My Computer” zone as well. That means any future versions are also fully trusted. That’s good, because that’s what you want: You automatically update your fully trusted application, and the new version should also enjoy the privileges of a fully trusted application. However, should someone sneak into your server and put a set of assemblies there, you would unwittingly deliver them to your entire install base. Worse, you’d give them that full trust by putting those assemblies on the local computer. That must be prevented. Validation prevents that.

Validation ensures that the files have come from a trusted source. Before you deploy your first version to any client computer, you generate a key that will be used to create the signature. That key is mixed in with the hash code generated from each downloadable file. That’s the important key point: The signature depends on the key, and the contents of the downloaded files. Should the server security be violated, the attackers will not have the key, and will not be able to generate the correct signature. In the same vein, if the attackers modify a file after you’ve installed it at the server, the signature will change. That will cause the validation to fail as well.

The Updater contains two possible validators you can use: a symmetric validator, and a public / private key pair (or asymmetric) validator. The asymmetric validator is more secure, because the client computers have a different key than the server. But you must guard your private key carefully. With either validator, any attacker that gains access to the key can fool you into downloading malicious content. That is a bit easier with the symmetric key because it is stored on client machines. It is encrypted, but it’s still not as safe as the asymmetric key. My recommendation is that you should use the asymmetric validator on any projects where security is a serious concern (and aren’t they all like that?)

Post Update Processing
The final addition to the Update Application block is the ability to perform post-update installation tasks. You will use this feature if you are updating a component that needs specific client-side processing to occur when an update is downloaded (like COM registration. In fact, the Updater block contains one class that implements IPostProcessor, to update the registry). To use the Post Processing facility, you create a class that implements the IPostProcessor interface, which has only one method: Run. That method should perform whatever processing you need. Include that assembly in the server manifest, with the instructions to load and execute the post-processing code:

type="Microsoft.ApplicationBlocks.
ApplicationUpdater.Quickstarts.RegPostProcessor"
assembly="FlexPoints, Version=1.0.0.0,
Culture=neutral, PublicKeyToken=null"
name="PostProcessor\Flexpoints.exe" />

The download manager will get the specified file, and after downloading and verifying the entire package, the post – processing instructions will be executed.

Which to choose?
I started this series with the App Updater component because it is the simple, straightforward way to deploy updates to a client application simply. I’m finishing with the Updater Application Block because it shows a combination of best practices for creating an extensible solution to this problem. All the extensible components are defined by interfaces that can be implemented in a variety of ways: IDownloader, IValidator, and IPostProcessor. An application configuration file defines which assemblies, and which types in those assemblies, should be created to do each of the tasks specified by these interfaces. You can add new capabilities to the Updater facility by creating new assemblies and referencing them in the config files. It’s rare that you will need to modify the core libraries.
Putting these facts together, the Updater block provides a much better framework for you to extend over time, should you need. It will also be applicable to a much wider array of applications. If you are an experienced .NET developer, use the Updater as your starting point. When you need features not already in the updater, you’ll find ways to extend it. On the other hand, the AppUpdater component is much simpler to understand and work with. If you’ve never worked with no-touch deployment, start there. Understand that component, build one or two self-updating applications, then move on to the Updater Application Block.

Thursday, October 26, 2006

ApplicationSettingsBase in .NET 2.0

The new namespace called System.Configuration and a class in that namespace called ApplicationSettingsBase that will be your new friend when dealing with this issue.

Before we dive into this topic more, a word here from experience with this class - it's remarkably easy and convienent to use as long as you take a few extra steps yourself. I don't give the issue of creating settings a moments thought anymore since this class was released in .NET 2.0.

Now, let's see why...

The first conundrum that a developer faces (and has always faced) when dealing with settings is where to put the data that needs persisting. In the Win32 world and even .NET 1.x, it was common to resort to the in-famous Registry to store application data. You basically have a choice - store it in the per-user area (Current User), or the per-machine area (Local Machine). The latter has additional restrictions in that you need read/write access to the registry keys that you want to edit there and a low rights user account may not have such access. It also can be problematic since there is one set of data there for all users which can complicate data that needs to be per-user.

The Registry also has another glaring deficiency (besides being easily corrupted and hard to edit) - there is no support for format changes to the data being stored. Imagine v1.0 of your glorious application shipped and had several setting entries. A few months go by and you ready v1.1 to ship to customers. You found the need to add some entries to your set and remove a few. You also decide to store these entries in a different registry subfolder. It's pretty much left to you to spend time writing a conversion/migration routine. Even worse, as versions of your application proliferate, you have to continue to update that conversion code to handle everything back to v1.0 so that any stragglers in your user base and get up to your latest version.

What a pain.

This is a place the Microsoft thought long and hard about when they devised ApplicationSettingsBase (which rumor has it derived from some excellent work done in the Microsoft Patterns & Practices group in the famous code "blocks"). ApplicationSettingsBase is one of those swiss army knives that allows a developer to handle how settings are stored, or leave it to the class to handle it on behalf of the developer. The latter is by far the most common and likely approach for most teams. Why spend time writing plumbing code when you can leave it to Microsoft? By default, ApplicationSettingsBase generates a .config file containing the settings stored in a XML format and stored deep down in the MyDocuments area. It's a known safe place to store application and user data and all users will have access to their own MyDocuments area.

Round three on managing settings in a .NET 2.0 application using System.Configuration. ApplicationSettingsBase. We're now at the point of talking about how this class supports migration of settings within your project.

The challenge with any implementation of application settings is how to manage the evolution of those settings over time. You may find the need to add, remove, update and adjust settings as time passes and your application evolves. Using the default storage provider in .NET 2.0, ApplicationSettingsBase writes out the settings and their values into an XML file similiar to app.config but called user.config. Your next question undoubtably is "where does .NET put this file?".

The answer is fascinating.

First, you have to remember that since settings are likely to be per-user based items, they need to go someplace guaranteed to be accessible to even a user with a low rights account (ie. User security group). The stipulated location for this kind of information is the "Documents and Settings" folder typically found in the root of your C: drive. This is also where the MyDocuments folder is located. However, ApplicationSettingsBase doesn't store (by default) its data in MyDocuments. It chose instead to place this information in Local Settings\Application Data. These is a sibling folder to MyDocuments and is intended for per-user data that is non-roaming (ie that is computer dependent).

As an aside, if you regularly deal with issues such as where to place files, what folders you should use for specific purposes, how to respond to environmental changes in the operating system, etc, I highly recommend getting a copy of Microsoft's Designed for Windows XP spec v2.3 which is in Word document format. This handy little tome will help you resolve and dispense with the interminable discussions that sometimes take place among developers trying to decide these issues.

Back to ApplicationSettingsBase. Although the Local Settings\Application Data folder is used, ApplicationSettingsBase doesn't stop there. It proceeds to create a sub folder named with the name of the company assigned to your application EXE file properties. If the name has spaces, those are substituted with underscores. Not sure why Microsoft does this, but they do. Next, the class creates a sub folder under the company name folder with the name of your EXE plus a bunch of ugly looking characters you can think of as a unique identifier of sorts. In this folder, it creates yet another sub folder with the version of your EXE. In that folder goes the user.config with your settings. It's important to note that the version number includes the full version number down to the build and revision octets.

Each time you build your application (by default) Visual Studio .NET 2005 helpfully updates your version number (actually build number)incrementing it each time. When this happens, ApplicationSettingsBase will automatically create a new sub folder in that location I described earlier with the new version number. Over time as you develop an application on a machine, you can end up with hundreds or thousands of these little sub folders each containing a version of the user.config file that existed for that build.

Now for the really interesting (and helpful) part.

When ApplicationSettingsBase is created when your application runs, it offers (but doesn't require) the ability to migrate older settings values to the new structure using ApplicationSettingsBase.Upgrade(). This is one of those auto-magical methods that makes your life as a .NET developer really sweet. This method will upgrade and copy values from an older build/version of your application into the new user.config. So you don't lose settings between builds and neither do your users. Which will make them very happy indeed.

Tuesday, October 24, 2006

Generic List

Generic List Class is a new in the .Net Framework version 2.0 .It represent strongly typed list of the object that can be accessed by index.It also provide methode for search,sort and manipulate list.

Namespace: System.Collections.Generic
Assembly: mscorlib (in mscorlib.dll)

[SerializableAttribute]
public class List : IList, ICollection,IEnumerable, IList, ICollection, IEnumerable

The List class is the generic equivalent of the ArrayList class. It implements the IList generic interface using the array whose size is dynamically increased as required.

The List class uses both an equality comparer and an ordering comparer.

Methods such as Contains, IndexOf, LastIndexOf, and Remove use an equality comparer for the list elements. The default equality comparer for type T is determined as follows. If type T implements the IEquatable generic interface, then the equality comparer is the Equals method of that interface; otherwise, the default equality comparer is Object.Equals(Object).

Methods such as BinarySearch and Sort use an ordering comparer for the list elements. The default comparer for type T is determined as follows. If type T implements the IComparable generic interface, then the default comparer is the CompareTo method of that interface; otherwise, if type T implements the nongeneric IComparable interface, then the default comparer is the CompareTo method of that interface. If type T implements neither interface, then there is no default comparer, and a comparer or comparison delegate must be provided explicitly.

The List is not guaranteed to be sorted. You must sort the List before performing operations (such as BinarySearch) that require the List to be sorted.

Elements in this collection can be accessed using an integer index. Indexes in this collection are zero-based.

List accepts a null reference (Nothing in Visual Basic) as a valid value for reference types and allows duplicate elements

Performance Considerations
In deciding whether to use the List or ArrayList class, both of which have similar functionality, remember that the List class performs better in most cases and is type safe. If a reference type is used for type T of the List class, the behavior of the two classes is identical. However, if a value type is used for type T, you need to consider implementation and boxing issues.

If a value type is used for type T, the compiler generates an implementation of the List class specifically for that value type. That means a list element of a List object does not have to be boxed before the element can be used, and after about 500 list elements are created the memory saved not boxing list elements is greater than the memory used to generate the class implementation.

Example

using System;
using System.Collections.Generic;

public class Example
{
public static void Main()
{
List names = new List();

Console.WriteLine("\nCapacity: {0}", names.Capacity);

names.Add("Vishal");
names.Add("Joe");
names.Add("Prashant");
names.Add("Deepak");

Console.WriteLine();
foreach(string name in names)
{
Console.WriteLine(name);
}

Console.WriteLine("\nCapacity: {0}", names.Capacity);
Console.WriteLine("Count: {0}", names.Count);

Console.WriteLine("\nContains(\"Vishal\"): {0}",
names.Contains("Vishal"));

Console.WriteLine("\nInsert(2, \"Shobhit\")");
names.Insert(2, "Shobhit");

Console.WriteLine();
foreach(string name in names)
{
Console.WriteLine(name);
}

Console.WriteLine("\nnames[3]: {0}", names[3]);

Console.WriteLine("\nRemove(\"Deepak\")");
names.Remove("Deepak");

Console.WriteLine();
foreach(string name in names)
{
Console.WriteLine(name);
}

names.Clear();
Console.WriteLine("\nClear()");
Console.WriteLine("Capacity: {0}", names.Capacity);
Console.WriteLine("Count: {0}", names.Count);
}
}

Monday, October 23, 2006

Settings in VS 2005

Settings can represent user preferences, or valuable information the application needs to use. For example, you might create a series of settings that store user preferences for the color scheme of an application. Or you might store the connection string that specifies a database that your application uses. Settings allow you to both persist information that is critical to the application outside of the code, and to create profiles that store the preferences of individual users.

In C# use settings by accessing the Properties namespace. In the course of this article, you will learn the difference between application and user settings, how to create new settings at design time, how to access settings at run time, and even how to incorporate multiple sets of settings into your application.


Application and User Settings
Settings have four properties:

Name: The Name property of settings is the name that is used to access the value of the setting at run time.
Type: The Type of the setting is the .NET Framework type that the setting represents. A setting can be of any type. For example, a setting that holds a user preference of color would be a System.Color type.
Scope: The Scope property represents how a setting can be accessed at run time. There are two possible values for the Scope property: Application and User. These will be discussed more in this section.
Value: The Value property represents the value returned when the setting is accessed. The value will be of the type represented by the Type property.

The crucial distinction between application-scope and user-scope settings is that user-scope settings are read/write at run time, and their values can be changed and saved in code. Application-scope settings are read only at run time. While they can be read, they cannot be written to. Settings with application scope can only be changed at design time, or by altering the settings file manually

Creating a New Setting at Design Time
You can create a new setting at design time by using the Settings designer. The Settings designer is a familiar grid-style interface that allows you to create new settings and specify properties for those settings. You must specify Name, Type, Scope, and Value for each new setting. Once a setting is created, it can be assessed in code using the mechanisms described later in this article.

To Create a New Setting at Design Time
1. In Solution Explorer, expand the Properties node of your project.
2. In Solution Explorer, double-click the .settings file in which you want to add a new setting. The default name for this file is Settings.settings.
3. In the Settings designer, set the Name, Type, Scope, and Value for your setting. Each row represents a single setting. Figure 1 shows an example of the Settings designer.

To Change the Value of a Setting Between Application Sessions

Using Microsoft Notepad or some other text or XML editor, open the .exe.config file associated with your application.
Locate the entry for the setting you want to change. It should look similar to the following example:

This is the setting value


Type a new value for your setting and save the file.

Wednesday, August 23, 2006

Iterators in c# 2.0

In C# 1.1, you can iterate over data structures such as arrays and collections using a foreach loop.
string[] cities = {"New York","Paris","London"};
foreach(string city in cities)
{
Console.WriteLine(city);
}
In fact, you can use any custom data collection in the foreach loop, as long as that collection type implements a GetEnumerator method that returns an IEnumerator interface. Usually you do this by implementing the IEnumerable interface:
public interface IEnumerable
{
IEnumerator GetEnumerator();
}
public interface IEnumerator
{
object Current{get;}
bool MoveNext();
void Reset();
}
Often, the class that is used to iterate over a collection by implementing IEnumerable is provided as a nested class of the collection type to be iterated. This iterator type maintains the state of the iteration. A nested class is often better as an enumerator because it has access to all the private members of its containing class. This is, of course, the Iterator design pattern, which shields iterating clients from the actual implementation details of the underlying data structure, enabling the use of the same client-side iteration logic over multiple data structures, as shown in Figure 1.


Figure 1


Figure 1 Iterator Design Pattern
In addition, because each iterator maintains separate iteration state, multiple clients can execute separate concurrent iterations. Data structures such as the Array and the Queue support iteration out of the box by implementing IEnumerable. The code generated in the foreach loop simply obtains an IEnumerator object by calling the class's GetEnumerator method and uses it in a while loop to iterate over the collection by continually calling its MoveNext method and current property. You can use IEnumerator directly (without resorting to a foreach statement) if you need explicit iteration over the collection.
But there are some problems with this approach. The first is that if the collection contains value types, obtaining the items requires boxing and unboxing them because IEnumerator.Current returns an Object. This results in potential performance degradation and increased pressure on the managed heap. Even if the collection contains reference types, you still incur the penalty of the down-casting from Object. While unfamiliar to most developers, in C# 1.0 you can actually implement the iterator pattern for each loop without implementing IEnumerator or IEnumerable. The compiler will choose to call the strongly typed version, avoiding the casting and boxing. The result is that even in version 1.0 it's possible not to incur the performance penalty.
To better formulate this solution and to make it easier to implement, the Microsoft .NET Framework 2.0 defines the generic, type-safe IEnumerable and IEnumerator interfaces in the System.Collections.Generics namespace:
public interface IEnumerable
{
IEnumerator GetEnumerator();
}
public interface IEnumerator : IDisposable
{
ItemType Current{get;}
bool MoveNext();
}
Besides making use of generics, the new interfaces are slightly different than their predecessors. Unlike IEnumerator, IEnumerator derives from IDisposable and does not have a Reset method.
The second and more difficult problem is implementing the iterator. Although that implementation is straightforward for simple, it is challenging with more advanced data structures, such as binary trees, which require recursive traversal and maintaining iteration state through the recursion. Moreover, if you require various iteration options, such as head-to-tail and tail-to-head on a linked list, the code for the linked list will be bloated with various iterator implementations. This is exactly the problem that C# 2.0 iterators were designed to address. Using iterators, you can have the C# compiler generate the implementation of IEnumerator for you. The C# compiler can automatically generate a nested class to maintain the iteration state. You can use iterators on a generic collection or on a type-specific collection. All you need to do is tell the compiler what to yield in each iteration. As with manually providing an iterator, you need to expose a GetEnumerator method, typically by implementing IEnumerable or IEnumerable.
You tell the compiler what to yield using the new C# yield return statement.

You can also use C# iterators on non-generic collections.
In addition, you can use C# iterators on fully generic collections. When using a generic collection and iterators, the specific type used for IEnumerable in the foreach loop is known to the compiler from the type used when declaring the collection—a string in this case:
LinkedList list = new LinkedList();
/* Some initialization of list, then */
foreach(string item in list)
{
Trace.WriteLine(item);
}
This is similar to any other derivation from a generic interface.
If for some reason you want to stop the iteration midstream, use the yield break statement. For example, the following iterator will only yield the values 1, 2, and 3:
public IEnumerator GetEnumerator()
{
for(int i = 1;i< 5;i++)
{
yield return i;
if(i > 2)
yield break;
}
}
Your collection can easily expose multiple iterators, each used to traverse the collection differently. For example, to traverse the CityCollection class in reverse order, provide a property of type IEnumerable called Reverse:
public class CityCollection
{
string[] m_Cities = {"New York","Paris","London"};
public IEnumerable Reverse
{
get
{
for(int i=m_Cities.Length-1; i>= 0; i--)
yield return m_Cities[i];
}
}
}
Then use the Reverse property in a foreach loop:
CityCollection collection = new CityCollection();
foreach(string city in collection.Reverse)
{
Trace.WriteLine(city);
}
There are some limitations to where and how you can use the yield return statement. A method or a property that has a yield return statement cannot also contain a return statement because that would improperly break the iteration. You cannot use yield return in an anonymous method, nor can you place a yield return statement inside a try statement with a catch block (and also not inside a catch or a finally block).

Friday, August 18, 2006

CLS and Non-CLS Exception

All programming language for the CLR must support the throwing of Exception derived object because the CLS mandate this. However, the CLR actually allows an instance of any type to be throw, and some programming language will allows code to throw non-CLS-compliant exception object such as a string,Int32 whatever.The c# comiler allows code to throw only Exception-derived objects,whereas code written in IL assembly language and C++/CLI allow code to throw Exception-derived objects as well as objects that are not derived from Exception.

Prior to version 2.0 of the CLR, when programmers wrote catch blocks to catch exception, they were catching CLS-compliant exceptions only. If a c# method called a method written in another language, and that method threw a non-CLS-compliant exception,the C# code would not catch this exception at all.

In version 2.0 of the CLR, Microsoft has introduced a new RuntimeWrappedException class.This class is derived from Exception,so it is a CLS-compliant type.The RuntimeWrappedException class contain a private field of type object.In version 2.0 of the CLR,when non-CLS-compliant exception is throw, the CLR automatically constructs an instance of the RuntimeWrapperdException class and initialize its private field to refer to the object that was actually throw.

private void TestMethod()
{
try
{
// some code
}
catch(Exception e)
{
//Before c# 2.0, this block catches CLS-compliant exception only
// In C# 2.0 this block catches CLS and non CLS compliant exceptions
throw;
}
catch
{
// in all version of C# this block catches CLS and non CLS compliant exceptions
}
}

If the above code is recompiled for CLR 2.0, the second catch block will never execute ,and the c# compiler will indicate this by issuing a warning: "CS1058: A previous catch clause already catches all exceptions.All non- exceptions will be wrapped in a System.Runtime.CompilerServices.RuntimeWrappedException."

There are two ways for developer to migrate code from an eariler version of .Net Framework to version 2.0:

1. You can merge the code from the two catch block into a single catch block.
2. You can tell the CLR that the code in your assembly wants to play by the old rules.That is tell the CLR that you catch blocks should not catch an instance of the new RuntimeWrappedException calss.
[assembly:RuntimeCompatibility(WrapNonExceptionThrows = false)]

Monday, August 07, 2006

Features of Ado.Net 2.0

1. Bulk Copy Operation

Bulk copying of data from a data source to another data source is a new feature added to ADO.NET 2.0. Bulk copy classes provides the fastest way to transfer set of data from once source to the other. Each ADO.NET data provider provides bulk copy classes. For example, in SQL .NET data provider, the bulk copy operation is handled by SqlBulkCopy class, which can read a DataSet, DataTable, DataReader, or XML objects.

Binary.BinaryFormatter format = new Binary.BinaryFormatter ();
DataSet ds = new DataSet();
ds = DataGridView1.DataSource
using FileStream fs = new FileStream(("c:\sar1.bin", FileMode.CreateNew")
ds.RemotingFormat = SerializationFormat.Binary

In this code snippet, we are serializing the dataset into filestream. If you look at the file size difference between XML and Binary formating, XML formating is more than three times bigger than Binary formating. If you see the perfomance of Remoting of DataSet when greater than 1000 rows, the binary formating is 80 times faster than XML formating

2. DataSet and DataReader Transfer

In ADO.NET 2.0, you can load DataReader directly into DataSet or DataTable. Similarly you can get DataReader back from DataSet or DataTable. DataTable is now having most of the methods of DataSet. For example, WriteXML or ReadXML methods are now available in DataTable also. A new method "Load" is available in DataSet and DataTable, using which you can load DataReader into DataSet/DataTable. In other way, DataSet and DataTable is having method named "getDataReader" which will return DataReader back from DataTable/DataSet. Even you can transfer between DataTable and DataView.

SqlDataReader dr ;
SqlConnection conn = new SqlConnection(Conn_str);
conn.Open() ;
SqlCommand sqlc = new SqlCommand("Select * from Orders", conn);
dr = sqlc.ExecuteReader(CommandBehavior.CloseConnection)
DataTable dt = new DataTable("Orders");
dt.Load(dr)

3. Data Paging

Now command object has a new execute method called ExecutePageReader. This method takes three parameters - CommandBehavior, startIndex, and pageSize. So if you want to get rows from 101 - 200, you can simply call this method with start index as 101 and page size as 100.

SqlDataReader dr ;
SqlConnection conn = new SqlConnection( Conn_str);
conn.Open()
SqlCommand sqlc = new SqlCommand("Select * from Orders", conn);
dr = sqlc.ExecutePageReader(CommandBehavior.CloseConnection, 101, 200)

4. Multiple Active ResultSets


Using this feature we can have more than one simultaneous pending request per connection i.e. multiple active datareader is possible. Previously when a DataReader is open and if we use that connection in another datareader, we used to get the following error "Systerm.InvalidOperationException: There is already an open DataReader associated with this connection which must be closed first". This error wont come now, as this is possible now because of MAR's. This feature is supported only in Yukon.

5. Batch Updates


In previous versions of ADO.NET, if you do changes to DataSet and update using DataAdapter.update method. It makes round trips to datasource for each modified rows in DataSet. This fine with few records, but if there is more than 100 records in modified. Then it will make 100 calls from DataAccess layer to DataBase which is not acceptable. In this release, MicroSoft have changed this behaiour by exposing one property called "UpdateBatchSize". Using this we can metion how we want to groups the rows in dataset for single hit to database. For example if you want to group 50 records per hit, then you need to mention "UpdateBatchSize" as 50.

Wednesday, August 02, 2006

Checked and Unchecked Primitive Type Operations

Programmers are well aware that many arthmetic operation on primitives could result in an overflow:
Byte b =100;
b = (Byte)(b+200);

In most programming scenarios, this silent overflow is undesirable and if not detected causes the application to behave in strange and unusual ways.In some rare programming scenariosthis overflow is not only acceptable but is also desired.

The CLR offer IL instructions that allows the compiler to chose the desire bhaviour.The CLR has an instruction called add that adds to values together.The add instruction performs no overflow checking.The CLR also has an instruction called add.ovf that also add two values together. However add.ovf theows a System.OverflowException if an overflow occur.CLR also has similar IL instruction for Subtraction,multiplication and data conversion.

C# allows the programmer to decide how overflows should be handled.By default, overflow checking is turned off. This means that comipler generate IL code by using the versions to add that don't include overflow checking. As a result the code run faster but developer must be assured that overflow won't occur .

One way to get the C# complier to control overflow is to use the /Checked+ compiler switch. This switch tell the comipler to generate code that has the overflow checking versions of add.

Rather than have overflow checking turned on or off globally, programmers are much more likely to want to decide case by case whether to have overflow checking.C# allow this flexibility by offering checked and unchecked operators.

Byte b = 100;
b = checked(Byte(b+200)); // overflow exception is throw
or
checked
{
Byte b =100;
b += 200;
}
}

Tuesday, August 01, 2006

CLR Event Model


The common Language runtime event model is based on delegates.A delegates is a type-safe way to invoke a callback method. Callback methods are the means by which objects receive the notification they subscribed to.
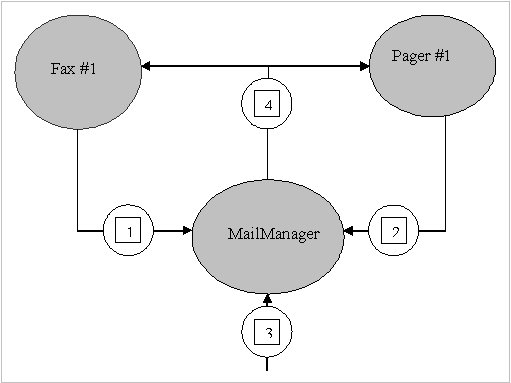
To help you fully understand the way event work within the CLR,I'll start with a secnario in which events are useful.Suppose you want to design an e-mail application.When an e-mail message arrives,the user might like the message to be forwarded to a fax machine or a pager.
In architecting this application,let's say that you'll first design a type,called MailManager,that receives the incoming e-mail message. MailManager will expose an event called NewMail. Oter type(such as Fax and Pager) may register interest in this event. When MailManager receives a new e-mail message,it will raise the event,causing the message to be distributed each of the registered objects.

When the application intializes,let's instantiate just one MailManager instance-the application can then instantiate any number of Fax and Pager Type.Above figure shows how the application initializes and what happen when a new e-mail message arrive.

The application intializes by constructing an instance of MailManager. MailManager offer a NewMail event.When the Fax and Page objects are constructed, they register themselves with MailManager's NewMail event so that MailManager knows to notify the Fax and Pager objects when new e-mail message arrive.

Step # 1 : Define a type that will hold any additional information that should be sent to receivers of the event notification

internal class NewMailEventArgs : EventAgrs
{
private readonly string m_from,m_to,m_subject;
public NewMailEventArgs(string from,string to,string subject)
{
m_from = from;
m_to = to
m_subject = subject;
}

public string from
{
get
{
}
return m_from;
}

public string To
{
get
{
}
return m_to;
}

public string Subject
{
get
{
}
return m_subject;
}


Step # 2 :Define Event member

internal class MailManager
{
publiuc event Eventhandler NewMail;
......
}

Step # 3: Define a method responsible for raising the event to notify registered objects that the event has occured

internal class MailManager
{
protected virtual void onNewMail(NewMailEventArgs e)
{
EventHandler temp = NewMail;
if(temp != null)
{
temp(this,e);
}
}
}

Step #4 : Define a method that translates the input into the desired event

internal class MailManager
{
public void SimulateNewMail (string from,string to,string subject)
{
NewMailEventArgs e = new NewMailEventArgs(from,to,subject);
onNewMail(e);
}
}


Designing a Type That Listen for an Event

internal class Fax
{
public Fax(MailManager mm)
{
mm.NewMail += FaxMsg;
}

private void FaxMsg(object sender, NewMailEventArgs e)
{
Console.writeLine("From{0} , To{1}, Subject{2}", e,from,e.to,e.Subject);
}

public void Unregister(MailManager mm)
{
mm -= FaxMsg;
}

}

Monday, July 31, 2006

Asynchronous Task

Asp .Net 2.0 give different way of executing task Asynchronous out of which one way is Registering AsynTask method.
RegisterAsyncTask is an alternative way to execute task asynchronously in Asp.Net page.RegisterAsyncTask is an API that is,to some exten,independent from asynchronous pages.In fact, it also work when the Async attributes of the @Page directive is set to false.Combined with asynchronous pages,though,it forms an extemely powerful programming model for lengthly operations.
You can use RegisterAsyncTask to register one or more asynchronous tasks.Tasks start when the page reach the async point- that is, immediately after the preRender event.

void Page_Load(object sender,EventArgs e)
{
PageAsyncTask task = new PageAsyncTask (new BeginEventHandler(BeginTask),new EndEventHadler(EndTask),null,null);
RegisterAsyncTask(task);
}

To call RegisterAsyncTask, you need to first create an instance of the PageAsyncTask class.The Constructor accepts up to five parameters
PageAsyncTask let you specify a timeout function and an optional flag to enable multiple registered tasks to execute in parallel.

The timeout delegate indicate the method that will get called if the task is not completed within the aysnchronous timeout interval.By default,an asynchronous task time out if not completed within 45 seconds.You can indicate a different timeout in either the configuration file or the @Page directive.Here's what you need if you opt for the web.config file


The @Page directive contains an integer AsynTimeout attribute that you set to the desire number of seconds.

Tuesday, July 25, 2006

Customized display of collection data in a PropertyGrid

If you assign array in PropertyGrid ,you'll see that propertyGrid display all the objects contained within that array.
for e.g
- Person
Name
Address
Age

An object may provide custom information about itself by implementing an interface ICustomTypeDescriptor. This interface can be used to provide dynamic type information. This is the case for a Collection object to return its content appearing as properties in a PropertyGrid

If ICustomTypeDescriptor is not used, then a static TypeDescriptor will be used at runtime, which provides type information based on the meta data obtained via reflection.

TypeConverters can also be used for more complex objects, such as classes, where the properties can be exposed at design-time. One of the ways to achieve this is through the ExpandableObjectConverter class. This class is a TypeConverter that creates a plus/minus sign box that can expand/contract the group of properties within that class.

Public Class HighlightingTypeConverter : ExpandableObjectConverter

Than you can override ConvertFrom and ConvertTo function . ConvertFrom Converts string to Highlighting class object and ConvertTo Converts highlighting class object to string value.

public override object ConvertFrom(ITypeDescriptorContext context,
CultureInfo culture, object value)

public override object ConvertTo(ITypeDescriptorContext context,
CultureInfo culture, object value, Type destinationType)

What is most important in ConvertFrom is that the value is converted to a string array by using the Split() method to break apart the string. We've defined the "@" character as a separator for the text. It can be a single character, multiple characters, or different characters separating each field.

string[] strValues = value.ToString().Split("@".ToCharArray())

Then you can assign this splited value to the properties of your class

ButtonAttribute btnsettings = new ButtonAttribute ();
TypeConverter typeColor;
typeColor= TypeDescriptor.GetConverter(typeof(Color));
btnsettings .BackColor = (Color)cvColor.ConvertFrom(context, culture,
strValues [0]);
return btnsettings;

and in case ConvertTo you have to convert the value into object.

ButtonAttribute btnsettings =(ButtonAttribute)value;
TypeConverter cvInt;
cvInt = TypeDescriptor.GetConverter(typeof(int));
TypeConverter cvColor;
cvColor = TypeDescriptor.GetConverter(typeof(Color));
// Create the string
string[] parts = new string[NumOfMembers];
parts[0] = (string)cvColor.ConvertTo(settings.BackColor, typeof(string));
parts[1] = (string)cvColor.ConvertTo(settings.ForeColor, typeof(string));
return String.Join(culture.TextInfo.ListSeparator, parts);

return base.ConvertTo(context, culture, value, destinationType);

Wednesday, July 19, 2006

Internal Structur of the GAC

The Purpose of GAC is to maintain relationship between a strongly named assembly and a subdirectory. Basically, the CLR has an internal function that take an assembly's name,version,culture,and public key token. This function then return the path of a subdirectory where the specified assembly's file can be found.
If you go to the command propmt and change to the %SystemRoot%\Assembly directory, you'll see the GAC actually spans multiple subdirectories. On my machine, I see the fo;;owing GAC-related directories:
c:\windows\Assembly\GAC
c:\windows\Assembly\GAC_MSIL
c:\windows\Assembly\GAC_32
c:\windows\Assembly\GAC_64

The c:\windows\Assembly\GAC directory contains the assemblies that were created for versions 1.0 and 1.1 of the CLR.These assemblies may contains entirely of managed code(IL), or the assemblies may contain managed and native x86 code.

The c:\windows\Assembly\GAC_MSIL directory contains the assemblies that were created for version 2.0 of the CLR.These assemblies consits entirely managed code.Assemblies in this subdirectory can run in a 32-bit or 64-bit address space therefore, they can rn on a 32-bit or 64-bit version of Windows.

The c:\windows\Assembly\GAC_32 directory contains the assemblies that were created for version 2.0 of the CLR.These assemblies contain managed code as well as native x86 code.Assemblies in this subdirectory are allowed to run only in a 32-bit address space and therefore, they can run on an x86 version of windows or using the Windows On Windows64
technology running on a 64-bit version of windows.

The c:\windows\Assembly\GAC_64 directory contains the assemblies that were created for version 2.0 of the CLR. These assemblies contain managed code as well as native x64 code. Assemblies in this subdirectory are allowed to run on in a 64-bit address space,and therefore, they can run only on on a 64-bit version of windows.

Wednesday, July 12, 2006

NEW Modules & Handlers in Asp net 2.0

In ASP.NET, requests are passed from the Web server through an Internet Server Application Programming Interface (ISAPI) filter and on to the actual ASP.NET runtime

When IIS receives a request, the extension is mapped to an ISAPI filter according to the IIS settings. The extensions .aspx, .asmx, .asd, and others are mapped to the aspnet_isapi.dll which is simply an ISAPI filter that launches the ASP.NET runtime. Once a request hits the ASP.NET runtime, it starts at the HttpApplication object, which acts as the host for the ASP.NET Web application. The HttpApplication object:

  1. Reads the machine and application level configuration files
  2. Passes the request through one or more HttpModule instances. Each HttpModule provides a service such as session maintenance, authentication or profile maintenance. These modules pass the request back to the HttpApplication.
  3. Passes the request to an HttpHandler based on the verb and the path. The verb refers to the HTTP verb used in the request (GET, POST, FTP, etc.) and the path refers to a URL within the application. Depending on how the handlers are configured, the request may be processed as an ASP.NET page (System.Web.UI.Page is an implementation of IHttpHandler), or the request may trigger another action such as batch-compilation of all Web pages (precompilation.asd triggers the PrecompHandler).


In ASP.NET 2.0, this model stays intact. However several new modules and handlers have been added to provide additional services. As with ASP.NET 1.x, you can extend, replace or reconfigure any of the module or handler classes in order to provide your own custom functionality.


New Modules
Naturally, new HttpModules have been added to support the new services offered in ASP.NET 2.0. Specifically, an ASP.NET application with default module settings will include new modules for:
SessionID—The session identification mechanism has been split off the ASP.NET 1.x Session module in order to provide greater control over cookies, URL rewriting and other forms of session ID generation.
Role Management—A new module has been added for providing role based services in support of the new user identification mechanisms. This module helps link ASP.NET applications to the role based security built into the .NET framework.
Anonymous Identification—The new personalization features support anonymous users. This module helps keep track of which features an anonymous user can access and how these features are maintained between requests.
Profile Management—The profile module links to the new profile service and helps provide user specific persistent data storage.

New Handlers
In addition to the new modules, ASP.NET 2.0 introduces new handlers to support the application configuration tools and other new features such as the batch compilation request. The most important of the new handlers include the ".axd" family which process Website administration requests. These handlers launch the internal administration tools that allow developers to configure ASP.NET users as well as other settings. The administrative handlers include:
Web Administration—The WebAdminHandler is the main page for the administrative Website. This handler provides the starting point for administering ASP.NET 2.0 Web applications.
Trace—The ASP.NET 1.x TraceHandler has been improved and is the only "axd" handler that was available in ASP.NET 1.x.
Web Resources—Web resources can now be configured post-deployment thanks to the new administrative tool and the WebResourcesHandler.
Cached Images—The CachedImageServiceHandler provides support for caching graphical components.
Precompile—As mentioned earlier, the PrecompHandler can be used to batch compile all of the ASPX pages in an ASP.NET application.
Web Part Export—The WebPartExportHandler provides support for storing and transferring Web Part layouts. Web Parts are a new mechanism for personalizing the look and contents of a portal style Web application.
As always, the HttpForbiddenHandler is linked to any file type that should never be returned. In ASP.NET 2.0, the list of forbidden file types has been expanded to include master pages, skin files and other new developer components

Tuesday, July 11, 2006

Code Access Security

This installment of .NET Nuts & Bolts is part one of a two-part series exploring code access security and how it is controlled by the Microsoft .NET Framework. The Microsoft .NET Framework includes a number of security features that assist you in developing secure applications. The security system, which is a fundamental part of the common language runtime (CLR), controls execution of .NET code. It includes handy features such as the following:Type safety enforcement, which eliminates the potential for buffer overruns Arithmetic error trapping, which detects the potential for underflows and overflows In addition, the .NET Framework provides the concept of evidence-based security. Evidence-based security works on top of the security provided by the operating system. For example, it works on top of Win32 security but is not a replacement for Win32 security. While Win32 is based on the user, the evidence-based security is based on the assembly. It gathers and presents information (or evidence) about the assembly to the security system, which then determines whether or not to allow the code to execute. For example, if code tries to read a file during execution, the security system verifies that the assembly has the required permissions and either grants access or throws a SecurityException.Evidence about an assembly can be controlled and influenced through things like strongly named assemblies, Authenticode signatures, or other custom information. Evidence is mapped to permissions through security policies, which rely on permission sets, code groups, and policy levels (enterprise, machine, and user settings) to achieve the mapping. Policies can be deployed throughout your organization through the Active Directory, but this discussion doesn't get into the specifics of that.

.NET has two kinds of security:

  1. Role Based Security
  2. Code Access Security

The Common Language Runtime (CLR) allows code to perform only those operations that the code has permission to perform. So CAS is the CLR's security system that enforces security policies by preventing unauthorized access to protected resources and operations. Using the Code Access Security, you can do the following:

  1. Restrict what your code can do
  2. Restrict which code can call your code
  3. Identify code

Code Access Security consists of following item

  1. Permissions
  2. Permissions Sets
  3. Code Groups
  4. Evidence
  5. Policy

Permissions

Permissions represent access to a protected resource or the ability to perform a protected operation. The .NET Framework provides several permission classes, like FileIOPermission (when working with files), UIPermission (permission to use a user interface), SecurityPermission (this is needed to execute the code and can be even used to bypass security) etc.

Permission sets
A permission set is a collection of permissions. You can put FileIOPermission and UIPermission into your own permission set and call it "My_PermissionSet". A permission set can include any number of permissions. FullTrust, LocalIntranet, Internet, Execution and Nothing are some of the built in permission sets in .NET Framework. FullTrust has all the permissions in the world, while Nothing has no permissions at all, not even the right to execute.

Code groups
Code group is a logical grouping of code that has a specified condition for membership. Code from http://www.somewebsite.com/ can belong to one code group, code containing a specific strong name can belong to another code group and code from a specific assembly can belong to another code group. There are built-in code groups like My_Computer_Zone, LocalIntranet_Zone, Internet_Zone etc. Like permission sets, we can create code groups to meet our requirements based on the evidence provided by .NET Framework. Site, Strong Name, Zone, URL are some of the types of evidence.

Policy
Security policy is the configurable set of rules that the CLR follows when determining the permissions to grant to code. There are four policy levels - Enterprise, Machine, User and Application Domain, each operating independently from each other. Each level has its own code groups and permission sets.

Wednesday, July 05, 2006

DataBinding in VS2003

In the .Net Framework, any object that implements the IList interface can be data provider.
This not onlyt inludes ADO.Net object, such as DataSet,DataView,DataTable, but also more mundane objects such as array or collection.
In previous Data Access technologies, a cursor was used to manage data currency. As the cursor moved,the current record changed and bound control were updates.Because Data access in Ado.Net is fundamentally disconnected, there is no concept of a database cursor Rather, each data source has an associated CurrencyManager that keeps track of the current record.CurrencyManager objects are managed through a form's BindingContext object.
The CurrencyManager objects keeps track of the current record for a particular data source. There can be multiple datasource in an application at one time,and each datasource maintain its own CurrencyManager.
You can use PositionChanged event of the CurrencyManager to disable back and forward buttons when the end of the record list is reached.

For e.g

public void onPositionChanged(object sender, EventArgs e)
{
if(this.BindingContext[DataSet1.Customers].Position == 0)
BackButton.Enabled = false;
if(this.BindingContext[DataSet1.Customers].Position == DataSet1.Tables["Customers"].Rows.Count -1)
ForwardButton.Enabled = false;
}

Tuesday, July 04, 2006

CAPTCHA


CAPTCHA an acronym for "completely automated public Turing test to tell computers and humans apart" trademarked by Carnegie Mellon University) is a type of challenge-response test used in computing to determine whether or not the user is human


Origin
Since the early days of the Internet, users have wanted to make text illegible to computers. The first such people were hackers, posting about sensitive topics to online forums they thought were being automatically monitored for keywords. To circumvent such filters, they would replace a word with look-alike characters. HELLO could become -3__() or )-(3££0, as well as numerous other variants, such that a filter could not possibly detect all of them. This later became known as "13375p34k" (leetspeak).
The first discussion of automated tests which distinguish humans from computers for the purpose of controlling access to web services appears in a 1996 manuscript of Moni Naor from the Weizmann Institute of Science, entitled "Verification of a human in the loop, or Identification via the Turing Test". Primitive CAPTCHAs seem to have been later developed in 1997 at AltaVista by Andrei Broder and his colleagues in order to prevent bots from adding URLs to their search engine. Looking for a way to make their images resistant to OCR attack, the team looked at the manual to their Brother scanner, which had recommendations for improving OCR's results (similar typefaces, plain backgrounds, etc.). The team created puzzles by attempting to simulate what the manual claimed would cause bad OCR recognition. In 2000, von Ahn and Blum developed and publicized the notion of a CAPTCHA, which included any program that can distinguish humans from computers. They invented multiple examples of CAPTCHAs, including the first CAPTCHAs to be widely used (at Yahoo!).

Some Implementation bugs
Some poorly designed CAPTCHA protection systems can be bypassed without using OCR simply by re-using the session ID of a known CAPTCHA image.[3] Sometimes, if part of the software generating the CAPTCHA is client-sided (the validation is done on a server but the text that the user is required to identify is rendered on the client side), then users can modify the client to display the unrendered text, etc.

For More Detail how to do it in Asp.Net 2.0
See this link http://www.codeproject.com/aspnet/CaptchaNET_2.asp